How To Make A Snowboard
Here at Douk Snow we hand produce every board from start to finish, and also offer a Build Your Own course so you can experience it for yourself. The course is designed for you to learn exactly how a board is put together, and understand some of the jargon brands use when describing their products.
The very first step to any board is printing the graphics for the base and topsheet. The design is printed onto to sublimation paper, and then put into a press where the sublimation takes place.The dye molecules that were a solid, held in the sublimation paper, turn directly into a gas and bond with the polymers in the base and topsheet.
One of the most important steps is the core. This is made up of poplar (with occasional ash or walnut stringers for stiffness). 12 planks of the wood are laid out and laminated together, and left to set overnight. They are then cut length ways, to create the core of the board.
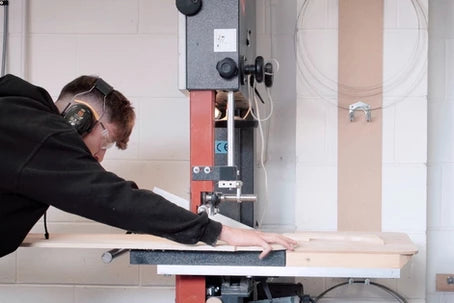
A jig is then used to measure a rough shape of the board, before being cut out with a bandsaw, and then fine tuned with a router. We then attach pre-cut side walls with glue which is then placed in a vice and left to set.
Whilst the core is drying the printed P-tex base is then measured out into the shape of the base using another jig. This is done before bending the metal edge around the board, which is then pinned, hammered and glued into place.
Once the sidewall glue is set, the wooden core is that passed through a planner to get it the exact width and tapper needed.
Holes are then routed into the wooden core for the binding inserts. Once this is done the inserts are then glued into place.
All of the individual components are then brought together ready for the lay up. We start with the base and edge, adding a layer of epoxy resin that is evenly applied. Sheets of fiberglass are sandwiched between the base, core and topsheet. As well as adding extra strips of fiberglass or carbon fibre which are placed strategically for added strength and stiffness.
Once the layup is finished, the board is placed into a heat press, a mould of the desired profile shape underneath. When in the press it stays under constant heat and pressure until the epoxy is set, and then removed from the mould for the final steps.
Excess material and epoxy is trimmed from the board, using the metal edge as a guide. Then the edge is sanded with a belt before a base grind, using specialised sandpapers to smooth out any imperfections and to add to the board structure.
The inserts are then found through the topsheet and drilled out by hand.
The edges are then sanded by hand, and using an edging tool. This is all done before the wax is applied. Finally, protective film is removed from the topsheet, and now the board is ready to ride.
If you want to experience making your own board, book in a build your own course to experience is for yourself.